ESP32-Cam 板載 Micro SD 記憶卡插槽,可以用來儲存相片等資料,如果您要做大量的資料傳輸,也可以把它拿來當作緩衝區使用。
原廠文件顯示 ESP32-Cam 最大只能用到 4G 記憶卡,但有網友表示 16G 也可以。

格式化記憶卡
記憶卡在使用前必須先格式化,格式化的規格有 NTFS、FAT、FAT32。
有一些記憶卡在出廠前即已完成格式化,在您將它插入電腦後可以確認一下。如果尚未格式化或是您想重新格式化,可以依照下列步驟實施。
Step1 將記憶卡插入電腦,打開「我的電腦」或「檔案管理員」。
Step2 用滑鼠右鍵點擊「抽取式磁碟」,再選取「格式化...」,出現視窗


Step3 選項「檔案系統」選取「FAT32」,按一下「開始」按鈕。格式化完成後會顯示如下視窗

格式化好記憶卡後,接下來進入主題--拍照並儲存到記憶卡。
這個程式的流程如下
進入睡眠模式 > 按下[重置按鈕] 喚醒 > 拍照 > 儲存到記憶卡 > (回到最前頭的進入睡眠模式)

認識板載 Micro SD 記憶卡插槽
ESP32-Cam 使用數個 GPIO 腳位控制 Micro SD 記憶卡,如下圖左邊的腳位全用上了


根據上面的腳位圖和電路圖,我們整理出 ESP32-Cam 和 Micro SD 腳位關係表,如下
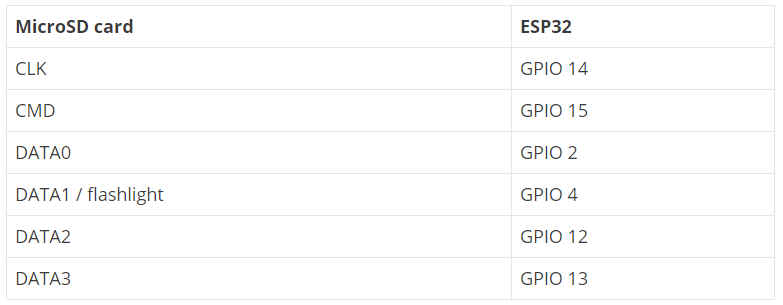
上述連接 Micro SD 的腳位,如果沒有在使用存取記憶卡功能時,可以設定輸出和輸入等 IO 功能。
同時,這些 GPIO 腳位都是 RTC,也都支援 ADC 功能。
程式碼
#include "esp_camera.h"
#include "Arduino.h"
#include "FS.h" // SD Card ESP32
#include "SD_MMC.h" // SD Card ESP32
#include "soc/soc.h" // Disable brownour problems
#include "soc/rtc_cntl_reg.h" // Disable brownour problems
#include "driver/rtc_io.h"
#include <EEPROM.h> // read and write from flash memory
// define the number of bytes you want to access
#define EEPROM_SIZE 1
// Pin definition for CAMERA_MODEL_AI_THINKER
#define PWDN_GPIO_NUM 32
#define RESET_GPIO_NUM -1
#define XCLK_GPIO_NUM 0
#define SIOD_GPIO_NUM 26
#define SIOC_GPIO_NUM 27
#define Y9_GPIO_NUM 35
#define Y8_GPIO_NUM 34
#define Y7_GPIO_NUM 39
#define Y6_GPIO_NUM 36
#define Y5_GPIO_NUM 21
#define Y4_GPIO_NUM 19
#define Y3_GPIO_NUM 18
#define Y2_GPIO_NUM 5
#define VSYNC_GPIO_NUM 25
#define HREF_GPIO_NUM 23
#define PCLK_GPIO_NUM 22
int pictureNumber = 0;
void setup() {
WRITE_PERI_REG(RTC_CNTL_BROWN_OUT_REG, 0); //disable brownout detector
Serial.begin(115200);
//Serial.setDebugOutput(true);
//Serial.println();
camera_config_t config;
config.ledc_channel = LEDC_CHANNEL_0;
config.ledc_timer = LEDC_TIMER_0;
config.pin_d0 = Y2_GPIO_NUM;
config.pin_d1 = Y3_GPIO_NUM;
config.pin_d2 = Y4_GPIO_NUM;
config.pin_d3 = Y5_GPIO_NUM;
config.pin_d4 = Y6_GPIO_NUM;
config.pin_d5 = Y7_GPIO_NUM;
config.pin_d6 = Y8_GPIO_NUM;
config.pin_d7 = Y9_GPIO_NUM;
config.pin_xclk = XCLK_GPIO_NUM;
config.pin_pclk = PCLK_GPIO_NUM;
config.pin_vsync = VSYNC_GPIO_NUM;
config.pin_href = HREF_GPIO_NUM;
config.pin_sscb_sda = SIOD_GPIO_NUM;
config.pin_sscb_scl = SIOC_GPIO_NUM;
config.pin_pwdn = PWDN_GPIO_NUM;
config.pin_reset = RESET_GPIO_NUM;
config.xclk_freq_hz = 20000000;
config.pixel_format = PIXFORMAT_JPEG;
if(psramFound()){
config.frame_size = FRAMESIZE_UXGA; // FRAMESIZE_ + QVGA|CIF|VGA|SVGA|XGA|SXGA|UXGA
config.jpeg_quality = 10;
config.fb_count = 2;
} else {
config.frame_size = FRAMESIZE_SVGA;
config.jpeg_quality = 12;
config.fb_count = 1;
}
// Init Camera
esp_err_t err = esp_camera_init(&config);
if (err != ESP_OK) {
Serial.printf("Camera init failed with error 0x%x", err);
return;
}
//Serial.println("Starting SD Card");
if(!SD_MMC.begin()){
Serial.println("SD Card Mount Failed");
return;
}
uint8_t cardType = SD_MMC.cardType();
if(cardType == CARD_NONE){
Serial.println("No SD Card attached");
return;
}
camera_fb_t * fb = NULL;
// Take Picture with Camera
fb = esp_camera_fb_get();
if(!fb) {
Serial.println("Camera capture failed");
return;
}
// initialize EEPROM with predefined size
EEPROM.begin(EEPROM_SIZE);
pictureNumber = EEPROM.read(0) + 1;
// Path where new picture will be saved in SD Card
String path = "/picture" + String(pictureNumber) +".jpg";
fs::FS &fs = SD_MMC;
Serial.printf("Picture file name: %s\n", path.c_str());
File file = fs.open(path.c_str(), FILE_WRITE);
if(!file){
Serial.println("Failed to open file in writing mode");
}
else {
file.write(fb->buf, fb->len); // payload (image), payload length
Serial.printf("Saved file to path: %s\n", path.c_str());
EEPROM.write(0, pictureNumber);
EEPROM.commit();
}
file.close();
esp_camera_fb_return(fb);
// Turns off the ESP32-CAM white on-board LED (flash) connected to GPIO 4
pinMode(4, OUTPUT);
digitalWrite(4, LOW);
rtc_gpio_hold_en(GPIO_NUM_4);
delay(2000);
Serial.println("Going to sleep now");
delay(2000);
esp_deep_sleep_start();
Serial.println("This will never be printed");
}
void loop() {
}
將上面的程式上傳到板子,
移除 GPIO0 和 Gnd 的接線,
打開「序列埠監視視窗」,
按一下板子上的 [Reset] 鍵,
您會發現閃光燈亮了一下,同時「序列埠監視視窗」顯示它已將一張照片儲存到記憶卡內。

然後呢?
它又進入睡眠模式,
除非您又按一下 [Reset] 鍵,
如此周而復始。
最後,我們用電腦檢查剛剛 ESP32-Cam 在記憶卡裡面儲存了哪些東西,如下

檔名是 picture???,後面數字是流水號。
檔案類型是 jpg
大小是 315KB
我查看了一下它的內容,如下

如果要作為長時間監控拍攝或縮時攝影,有必要把照片的尺寸和解析度縮小才行。
採購資訊
Micro SD 4G 記憶卡 https://www.ruten.com.tw/item/show?22033106394834
ESP32 開發指南(書) https://www.ruten.com.tw/item/show?22023657661505
ESP32-Cam 開發板 https://www.ruten.com.tw/item/show?22018501441929
ESP32-Cam 雙軸雲台(基本款)套件 https://www.ruten.com.tw/item/show?22024688065979
ESP32-Cam 雙軸雲台(人體偵測款)套件 https://www.ruten.com.tw/item/show?22024688076465
沒有留言:
張貼留言